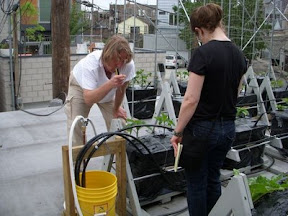
I knew I wanted to work with one of the strengths of the SIP, its water reservoir, rather than adapt watering systems and techniques used for ordinary container or garden irrigation. While it's possible to run zoned drip lines or soaker hoses, they both have drawbacks.
What I came up with is inexpensive, has no moving parts or timers, uses a minimum of water, is easy to set up and operate, and (almost always) works. I think I've got a way to make it foolproof, more on that in Part 2. It's based on what, at first glance, seem like complicated ideas. However, most people intuitively understand what's going on, it just takes a few convoluted sentences to explain why it works.
I'm hoping that this post will draw some constructive criticism that we can all benefit from.
Why Does It Work?
 The basic design has a central reservoir, in my case a 5 gallon food grade bucket (in yellow in the photo on the right), that's supplied by a drinking water hose (the white hose that comes from the bottom of the frame and splits off just above my right knee) and with its water level controlled by a Hudson valve (the valve is suspended in the bucket at the end of a 1/2" copper line). Out of this bucket run three (3) 1/2" black polyethylene tubing lines that loop around groups of planters. There are ten planters supplied by each loop. The individual planters are in turn fed by short lengths of 1/4" poly tubing that "tee" off of the 1/2" loops.
These loops aren't pressurized. Instead water moves from the 5 gallon reservoir to the individual planters via the loops by atmospheric pressure. I'm sure there's a scientific principle behind this, probably discovered by Archimedes, but I don't know what it is. So I'm going to call it the "water-level principle". The expression "water seeks it's own level" is another way of putting it.
Here's a diagram of a basic water level, typically used in construction projects.
It doesn't matter where the tubes go, as long as they're free of air bubbles, the height of the water in all three places (at the end of the dashed tube on the left, the reservoir in the middle, and at the end of the blue tube on the right) are all the same.
If you take this one step further and connect a series of reservoirs with tubes that are full of water, all the reservoirs will equalize at the same height.
 Take a look at this picture. Obviously you can't see the water moving, but when I remove water from one of the containers the remaining water is transferred via the tubes until each container has the same height of water in it. Conversely, if I add water to any or all of the containers, there will be a new higher (and equal) even height.
Now pull all this together.
I know that a Hudson valve can keep the height of the water in the reservoir at a specific level. Using the process shown in the second photo, I can hold each of the individual planter water chambers at that same fixed level. Each type of plant "drinks" water at a different rate; it doesn't matter. Once the water level in a specific planter goes below the level established in the main reservoir/bucket, the siphon tubes will take water from the neighboring planter in the loop. Each successive planter takes from the one "before" it in the loop until the water is eventually drawn from the main reservoir. The Hudson valve senses that the water has fallen below the predetermined height and it opens, allowing water from the hose to fill the reservoir back to the necessary level.
That's the theory. There are some tricks to get it working.
In Part 2 I'll talk a little about that.
[ed. - Here's the link to Part 2]


